User roles: ✔ User Administrator
This article describes how to create and edit user accounts.
To access the User Management console select User Management from the drop-down menu under your Avatar.

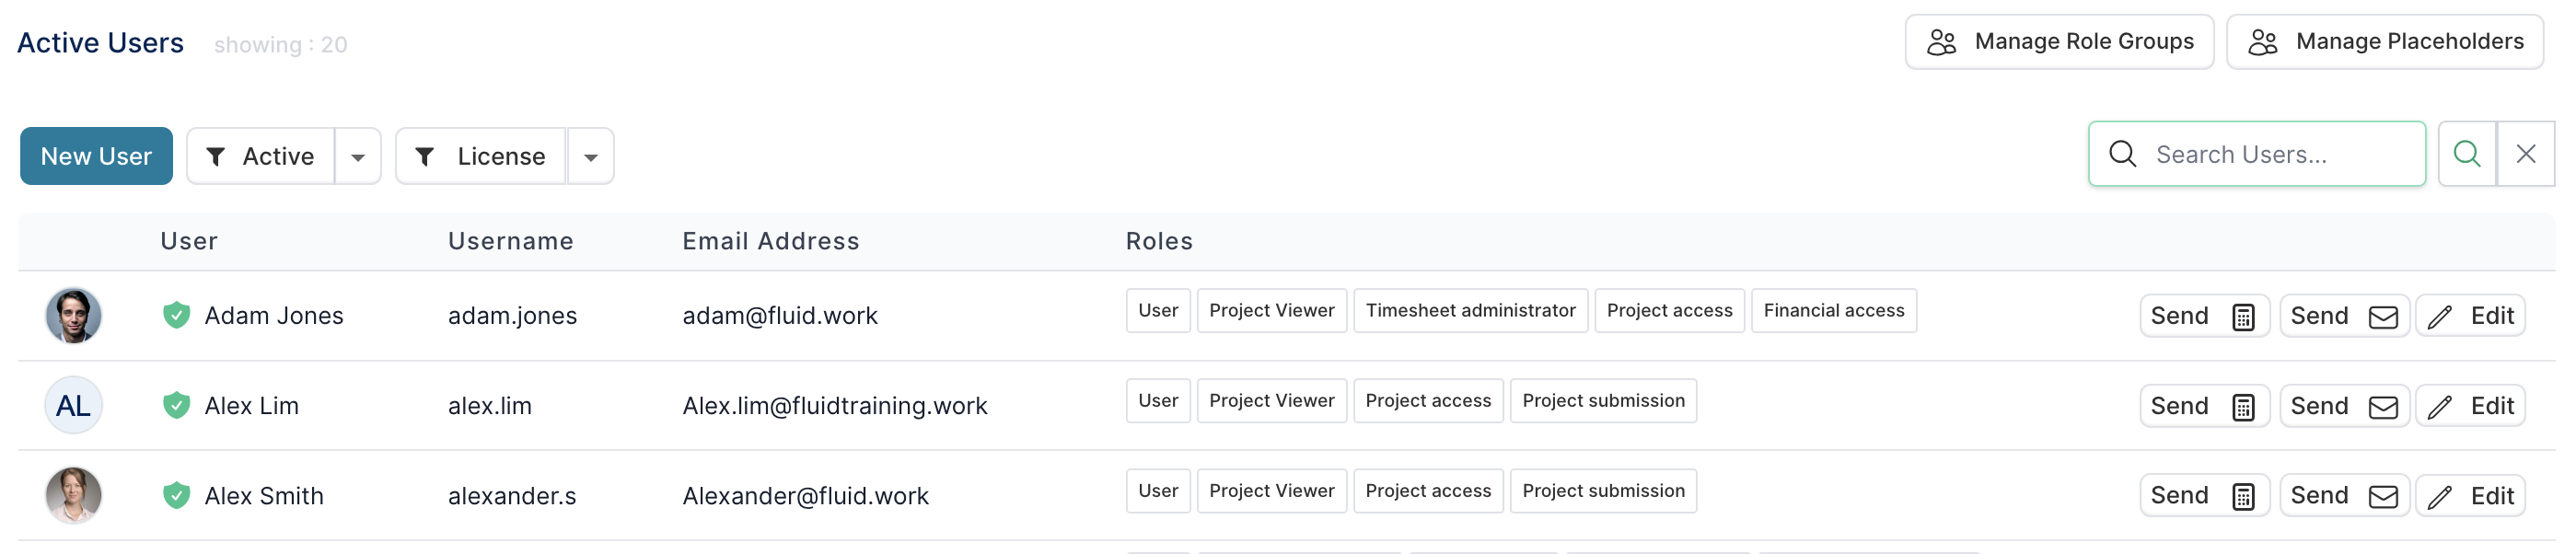
Accounts are listed in alphabetical order on the User management page, with the following displayed for each account:
- The account's picture/avatar.
- The full name of the account holder.
- The account's username - the username is the unique identifier for the account.
- The registered email address for the account.
- The roles that the account is permissioned with. Click here for more on account roles and what access and functionality they allow.
User accounts can be created and edited either:
- by using the interface which is covered in this article, or
- by using bulk edit upload/download functionality via the Resource Plan Upload.
At the top of the user management console are the following functions:

Manage Role Groups
Manage Role page where you can see the list of users per user roles and easily add or remove user roles. You can find more details about this page by clicking here.
New User - Create a new user account.
Filter - Filter the listed accounts by:
- Active
- Inactive - the account is effectively 'archived'. It cannot be used and the account is no longer available for selection
- Locked - accounts that have been locked due to the incorrect entry of credentials.
- Pending - accounts for people that have been invited to Fluid, but have not yet accepted the invitation and completed registration.
Search - Search the listed accounts for a specific user.
License Filter - Filter the list of license types for user accounts:
- License - all user accounts that have been registered.
- Unlicensed - accounts that are not registered.
- Collaborator - user licenses that only contribute to specific areas in the system (updates).
Manage Placeholders - Click here to navigate to the Manage Placeholders page where you can see the list of placeholders. You can find more details about this page in the Placeholder Management article.
Creating a new account
Click on the New User button to create a new user account.
There are several sections to be completed & each section can be accessed using the left hand navigation.

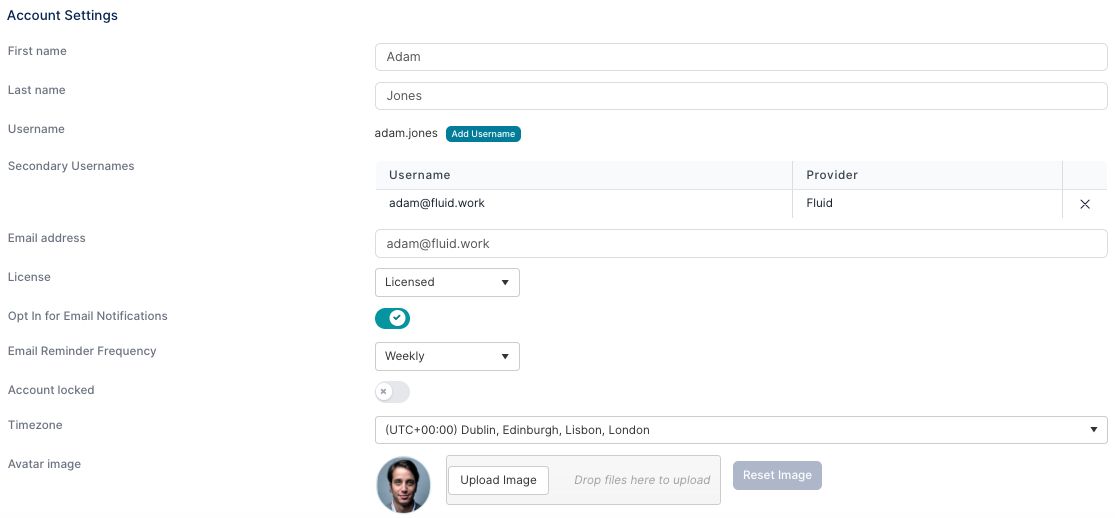
Account Settings
- First Name
- The first name of the account holder.
- Last Name
- The last name of the account holder.
- Username
- The unique username for the account. You can use FirstName.LastName, the person's email address or any other unique naming convention you prefer for your accounts. Once an account is created the Username of the account cannot be changed.
- Email address
- The account holders email address. Remember - if Email Domain Restrictions is turned on for the instance only email addresses with whitelisted email domains can be registered.
- License
- The type of license the user has. If a user account is Unlicensed, the account will be set without the User security role by default as they are regarded as accounts that are not registered.
- Opt in for Email Notifications
- Set to YES if the account holder should receive email notifications.
- Email Reminder Frequency
- How frequently the account holder should receive the Fluid email digest of their open and overdue actions, tasks and decisions in Fluid. The frequency for all email notification options are as follows:
- Daily - emails are sent out everyday at 08:15 am.
- Weekly - emails are sent out at 09:15 every Monday. Note - when creating a new user, the default notification frequency will be set to Weekly.
- Monthly - emails are sent out at 08:00 am on the first day of each month.
- How frequently the account holder should receive the Fluid email digest of their open and overdue actions, tasks and decisions in Fluid. The frequency for all email notification options are as follows:
- Timezone
- Set the timezone of the account holders location.
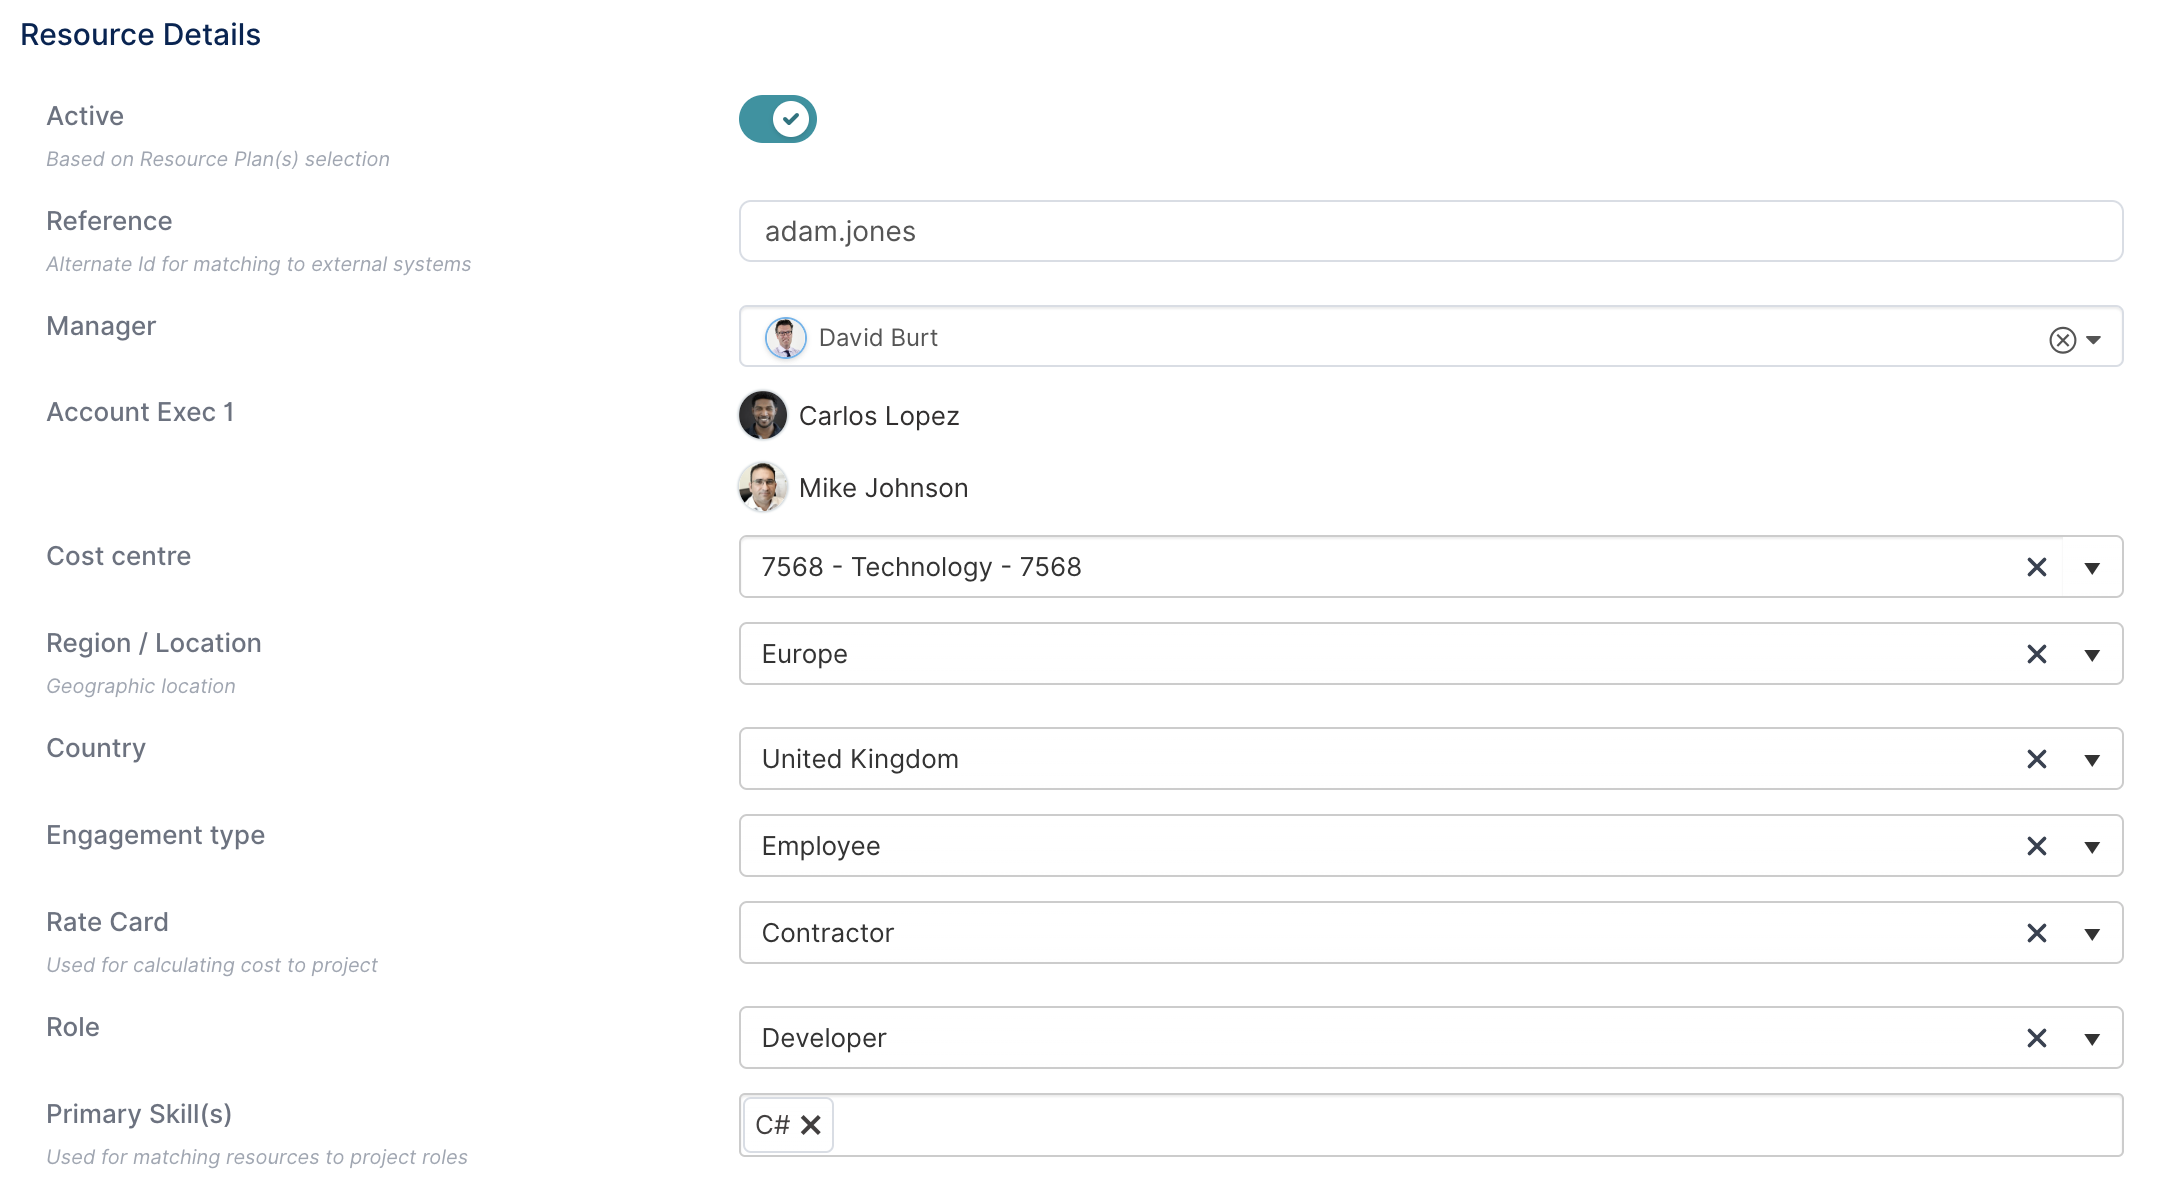
Account Details
- Active
- This flag indicates whether the account is active. YES for active, NO for inactive.
- Reference
- Free text field to include a unique reference for the account (useful if importing from 3rd party solutions)
- Manager
- The account holder's line manager - and the person responsible for approving their timesheets if applicable.
- Account Exec 1
- The accountable executive the account holder reports into. This value is automatically calculated and is based on the account holder management hierarchy.
- This value will be blank is the account holder is an accountable executive or has no manager set.
- Account Exec 2
- The direct report of the account holder's accountable executive.
- This value will be blank if the account holder has no manager set or is an accountable executive.
- If account holder directly reports into an accountable executive, this value will be either blank or set to the accountable executive based on the instance configuration.
- Cost centre
- The cost centre the resource belongs to
- Region
- The region the account holder is located in (option values need to be configured by the system administrator).
- Country
- The country the account holder is located in (option values need to be configured by the system administrator).
- Engagement Type
- The type of resource the account holder is (option values need to be configured by the system administrator).
- Rate Card
- The Rate Card that should be applied to the account holder.
- Role
- The primary title/role of the account holder within the organisation (options available configurable by system administrator)
- Primary Skills
- Include any primary skills the account holder has.
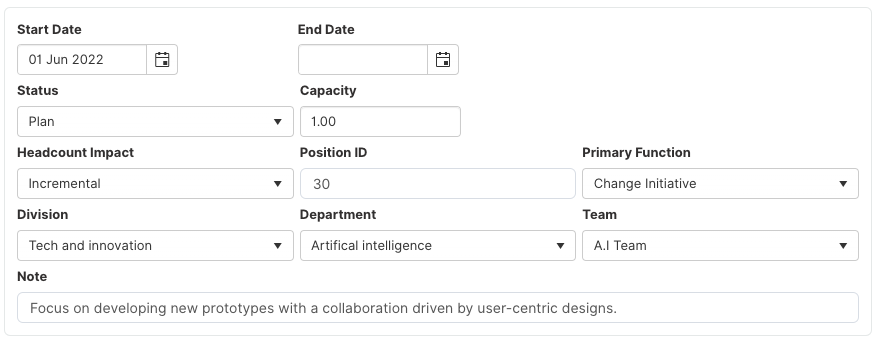
Resource Plans
Resources can have multiple resource plans.
- Each resource plan has a start and end date and the property values associated to the resource plan are only valid during the resource plan period.
- The resource plans cannon overlap.
A resource is active if they have a resource plan with an end date in the future otherwise the resource is set to inactive.

Click Add New Plan to create a new resource plan or click on the pencil icon to edit one.
- Start Date
- The start date of the resource plan. The start date of the first resource plan usually represents the date from which the resource is active.
- End Date
- The end date of the resource plan. The end date of the last resource plan usually represents the date the resource leaves the organisation.
- Allocation
- The maximum allocation this the account holder can be allocated to a project.
- Status
- Indicates the current status of the the account holder - i.e Onboard, Leave, etc.
- Hourly Rate
- If the Disable Resource Plan Hourly Rate feature is turned off, then you can set the hourly rate for the resource. This rate will override the hourly rate from the resource's rate card.
- Headcount Impact
- Indicates whether the account holder position is incremental, a replacement, etc.
- Position ID
- Position ID of the account holder.
- Primary Function
- Primary function of the account holder.
- Division
- The division that the resource belongs to (option values need to be configured by the system administrator or project administrator).
- Department
- The department that the resource belongs to (option values need to be configured by the system administrator or project administrator).
- Team
- The team that the resource belongs to (option values need to be configured by the system administrator or project administrator).
- Notes
- Free text filed to add any information on the resource plan.
- Free text filed to add any information on the resource plan.
Security Roles
Select which roles groups the account needs to belong to. For more on role groups and what access/functionality they allow, click here.

Security
Add a pre-defined password for your resource's account that they can use you access Fluid and send a registration email to notify the resource by setting the "Send Email" option to "Yes".

When you have finished populating all the account details click on CREATE at the top of the page to create the account.

Editing an existing account
To edit an existing account, click on the name of the account holder or the Edit button (edit pencil on the far right).

All sections on an existing account are the same with the exception of the Account Settings section. Only the fields that differ between creating a new account and editing an existing account are detailed below:
- First Name
- Last Name
- Username: The unique username for the account. Once an account is created the Username of the account cannot be changed... But you can add additional user names to the account by clicking on ADD USERNAME. These will be considered 'secondary' usernames and the account holder can use them to log in, but the primary username will remain the username given when the account was created.
- Single Signon Providers: Should the instance be set up for O365 or SSO integration you can see here whether the account holder has linked their account.
- Email address
- Opt in for Email Notifications
- Email Reminder Frequency
- Timezone
- Avatar: From here you can upload an avatar for the account if required. Account-holders are also able to upload their own avatars.

Was this article helpful?
That’s Great!
Thank you for your feedback
Sorry! We couldn't be helpful
Thank you for your feedback
Feedback sent
We appreciate your effort and will try to fix the article